Thursday, October 20, 2011

How To Design Your Own Jewelry

Coming up with my own design is something I really like to do but it’s a challenge. Making jewelry, for me, is a little like cooking. I usually try an existing  recipe first following the directions to the letter. After I eat my new meal I think about how I would change the recipe to make it a touch different or, in some cases, better. If I didn’t cook all the time, trying new recipes, new ingredients, I wouldn’t have the ability to change a recipe from lack of experience. After cooking for a lot of years and trying many recipes, I’m more comfortable now and readily omit and add ingredients. Sometimes I’m successful, sometimes not, it just takes practice and a willingness to fail sometimes.

Making jewelry is very much the same. In the beginning I just followed directions. I’d find a pattern I liked and ordered exactly the beads they told me to get, the sizes, and sometimes even the colors they specify. I would follow the pattern religiously and rip out any time I discovered I had made a mistake. Until I had mastered a stitch (Chevron, RAW, Herringbone, Crossweave) I would not alter a design. But now I’m a few years into beading and have become more adventurous. Sometimes I alter designs and then realize *why* it had to be a size 15 delica and not an 11 round seed bead. Sometimes it doesn’t matter at all. For me, it’s how I like to learn—trial and error.

Recently I found this free earring design on Bead & Button’s  website. They’re called Mosaic Medallions. It uses RAW and doesn’t take a lot of beads. I never really make earrings—it’s pretty rare. But, I usually have a few leftover crystals from bracelets and necklaces laying around and thought this would be a good way to use them up.

But the design wasn’t exactly what I liked. However, I did the design first as instructed.  Ten minutes after I finished them, I ripped them out. I modified the design and made these instead.
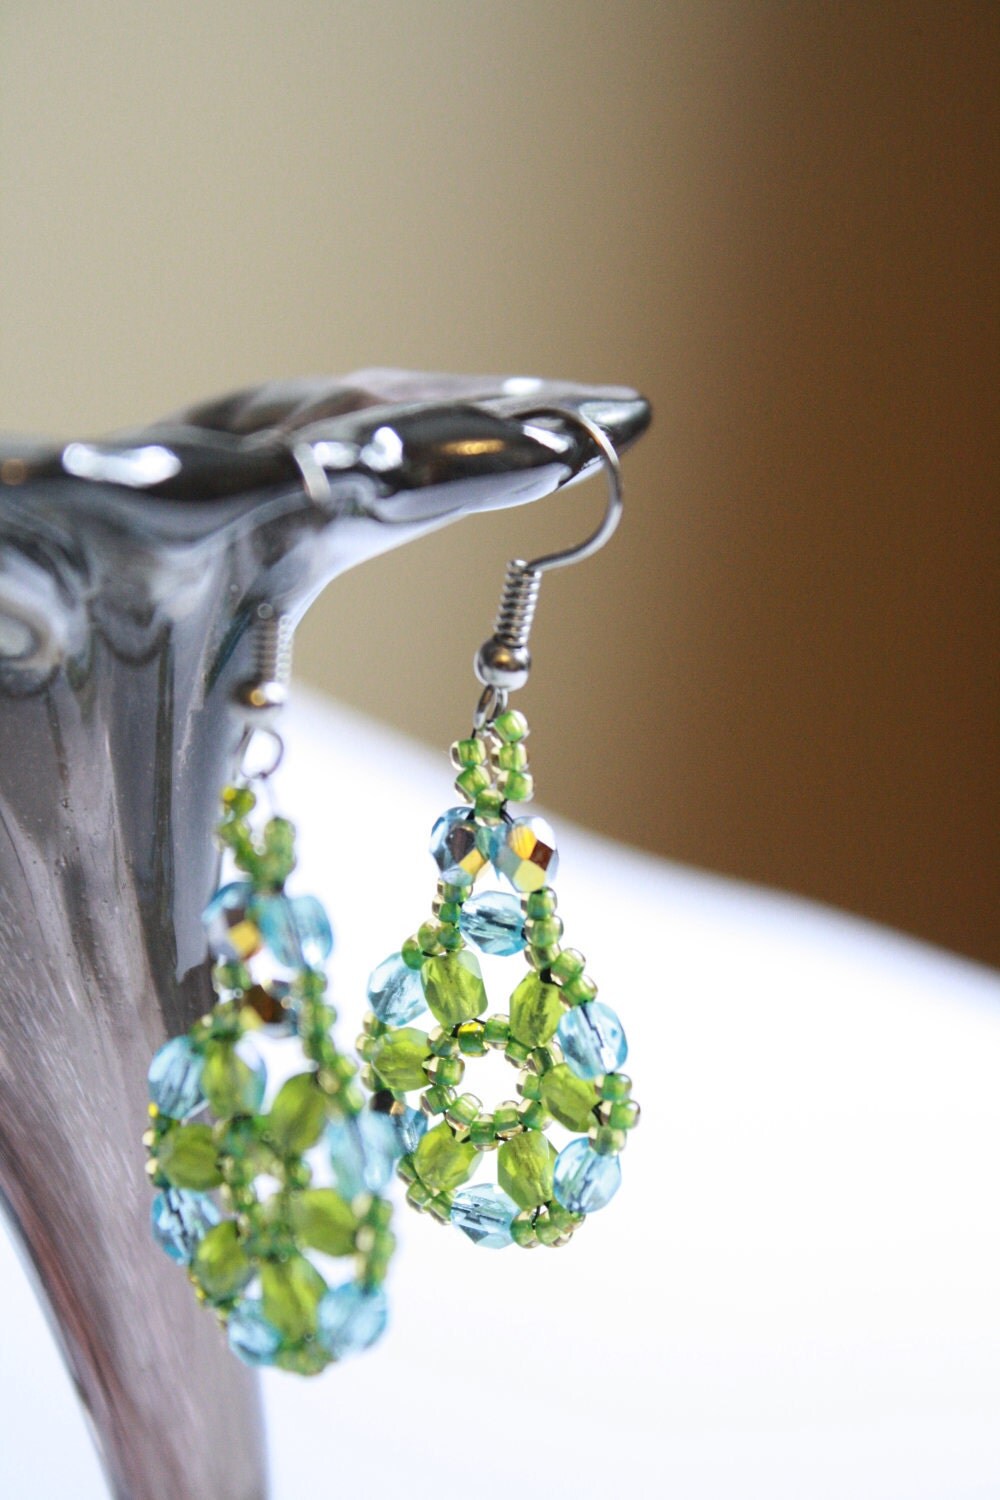


Personally I like mine better. But if I hadn’t made the first design it wouldn’t have occurred to me to make these.

How do you come up with designs?


Wednesday, October 5, 2011

Accepting Credit Card Payments

Claudine & Max at the ExpoTomorrow, October 6th, is the Women’s Expo at Middle Country Library in Centereach. It’s from 10am to 6pm. If you’ve never been to it—make some time in your day to attend (and if you are a vendor, definitely DEFINITELY put this one on your list for next year).

I don’t do a lot of fairs but when I do accepting credit cards is a must. I have a few low-priced items but mainly, the stuff I’m dying to sell is pricy. If I didn’t accept credit cards I’d lose a lot of sales.

Last year I did some research on accepting credit cards. I’ve used PayPal for years as an ETSY and EBAY seller. It works great for online payments. But if I wanted to use them for credit cards at the expo, they would charge me a monthly fee in addition to all the other fees built in per transaction. Right now, I average 2 fairs a year. Why would I sign up for a monthly fee? Last year I tried a company called ProPay. Instead of a monthly fee they do an annual fee.  I used to write down the CC info on those carbon papers you can buy at Staples and then input the information on the web once I got home. Taking a risk? Yes, but I’ve never been burned (yet).

Now with smart phones it’s even easier (IF you have connection) to capture credit card info at the fair. If you don’t have connection, you’ll need to get the information somehow, so that’s when I use the carbon imprint papers. When I went to sign in for the fair this year I noticed that my ProPay membership had lapsed and I’d have to renew—for $50 bucks.

So I went to twitter and asked the masses. I have a TON of fellow handmade crafters and twitter friends that were really helpful. Check them out: @ittybittybag, @easton_place, @cheekymaiden, @uffishL, and @thecoastalchick.  Overwhelmingly they all said, “I use @square.”

Here are the benefits to Square:

  • No annual fee
  • No monthly fee
  • Pay small fee per transaction (and you don’t need a flowchart to figure it out) 2.75% per swipe for all cards
  • Next-day payout with automatic direct deposits to your bank account
  • Free reader, free app for iPhone, iPad and Android
  • Available when your friends that stop by your house and do some “shopping”

I signed up on Sunday and had an official account linked to my checking account in minutes. I don’ t have the swipe thing yet and the fair is tomorrow—but I can still accept cards. I will just input them later (with a slightly higher fee at 3.5% + 15¢ per transaction.) It’s STILL better than laying out $50 bucks before making any sales. I’d have to have more than $1500 in credit card charges to hit $50 in fees. While I like to be optimistic—I doubt I’ll sell $1500 worth of jewelry (but boy—wouldn’t that rock?)

Hope to see you there tomorrow!!

Wednesday, September 14, 2011

DIY Bracelet Display Using PVC Pipe

I’m participating in a really great craft show soon. The Eleventh Annual Women’s Expo. For local people: it will be held at Middle Country Public Library in Centereach (101 Eastwood Blvd.) from 11 AM - 6 PM on Thursday, October 6, 2011. I don’t do a lot of craft fairs. They’re a ton of work and not always a lot of return on the investment. Kind of a crapshoot. You just don’t know what kind of crowd will come. My stuff is expensive—I get it. I don’t sell volumes like some of the other booths do. This craft fair is different—they really cater to women-owned businesses. They have people help you unload your stuff and carts to bring it in.  They advertise the heck out of this thing and you would NOT believe the crowds.  So, when I was sent a letter asking if I’d like to come back I yelled, “Mais, OUI!”

I needed some more displays for the jewelry. I don’t want to go and plunk down tons of cash on store-bought displays. Seems counter-intuitive since I don’t do a lot of craft fairs.

I went looking through the garage for scraps (hey, look at me recycling!) and hit the local Michaels store. I had some 2x2 pieces laying around and some 4” PVC pipe. I asked the husband to get out his saw (he’ll do anything to fire up the power tools. If I attempt to use the tools he gets very anxious. I’d like to point out that I DID get an A in wood shop. Whatever.)

Assembly

I had husband cut the pipe in half so I would wind up with two semi-spheres. Is that a word? It should be.

IMG_4801

IMG_4803

Then I assembled my supplies. Hot glue gun, really cool sheets of felt, scissors, and glue sticks.

The sheets of felt are really nice. They’re thicker than the usual stuff (and more expensive at 99/sheet) but they’re still cheaper than buying a $10 display at the store. They also match my business cards that I just had done by the fabulous Heidi Antman at Faboographics.

I wanted the edges to be covered so I cut the felt leaving me about an inch of overlap.

IMG_4804

I applied hot glue to the PVC pipe and rolled it back and forth to cover the base with felt. Be careful—the glue is hot. I know, that seems like a dumb thing to say right? However, I lost some of the skin on my thumb today. DOH!

IMG_4808

After doing the base I did the ends and then the sides. The ends are easy. Apply glue, fold over. The glue dries pretty quickly (which is why it’s so perfect for this little project.)

IMG_4806

The other sides were a little trickier since the fabric was thicker and I want the edges to be perfect. Who will look under the displays? No one you say? Well, I will know—and that’s why I have to have them as close to perfect as possible.

I needed to use a lot of glue (this is actually when I burnt my thumb). So, get a pencil or something to use to push the fabric down instead of your finger. Live and learn. I did the ends first by folding in neatly and putting a lot of glue. I used these large clips to hold the fabric in place until it dried.

IMG_4807

Once dry, I finished the sides and voila—a bracelet display was born.

IMG_4809

Now, I need to go dress this wound and then I’ll work on my next post: DIY burn care.

Tuesday, May 31, 2011

How and Where to Sell Your Jewelry

One question that I’m asked a lot is if I “make money” selling my jewelry. Honestly? Not really. It’s a hobby gone awry and I’m desperately trying to clear out the supply I build up on a continuous basis and maybe fund the addiction.

I don’t give my jewelry away. (I mean, I give it as gifts but I don’t sell it for cheap). The supplies I use are top quality and are not cheap. I put a lot of time into them too but I really don’t factor time into my pricing. You wouldn’t sell a THING if you did.

Here are a few places I’ve sold and what my thoughts are about each venue.

Craft Fairs

Claudine & Max at the ExpoMany people sell at craft fairs. Many, many, many jewelry vendors sell at craft fairs. This is a tough place to sell. If you figure out the hours that you’re there, the money it took to reserve the space, the set up and take down, travel to/from, you’d need to bring in a pretty good haul to make it worth it. And, there’s tremendous competition. So far, for me, I’ve not found craft fairs all that worth it.

Online

imageIt’s tough to sell online if you don’t have a great camera and some photography skills. I was using a point/shoot camera and just winging it and not really selling much. I upgraded my camera, got some advice, and within 24 hours of reshooting some jewelry had a slew of sales. People can’t pick it up and touch it—you’d better make sure your photos are great. I currently sell on ETSY.com. You can’t just list things and sit back though—you really need to work on marketing. You need good descriptions, good tags, and to get featured in treasuries.


Shops

I had a local business offer to sell my items in their spa. At first I thought it was a great deal. They took a large cut and I was left barely covering my costs. I pulled my stuff out since it wasn’t worth it. I’ve had others come to me asking if I wanted to sell in their stores and I’m considering it—but only limited inventory and for smaller percentage of sales. If they take a large cut I need to increase my price and then no one buys. Lose/lose. If you sell in shops, be sure and keep good track of your inventory. Keep a spreadsheet listing all the items, descriptions, and prices. Jewelry is very easy for someone to slip in a pocket.

Friends

One friend of mine loves my jewelry and is often buying from me. She has mentioned my jewelry to many people and that results in sales. Another person offered to sell my jewelry at school. She had been drooling over one of my bracelets and I said, “You sell my stuff and you can have that bracelet.”  Well, she’s currently sold more in the last few weeks then I’ve ever sold at craft fairs or online.

My local Hospital

Has vendors come in each day and sell at the hospital. You donate a portion of the proceeds to the hospital. I haven’t done this yet but I’m getting on the calendar. I’ll let you know how it goes.


Thursday, May 19, 2011

Teaching Classes

IMG_2036I’ve been asked to teach classes. I teach on occasion now—at different libraries in Suffolk County. That works pretty well but that means I need to wait until the library wants to run a jewelry class and it often fills SO fast that my friends can’t get into the class. So what to do?

I’m thinking of starting in-home jewelry-making classes. I haven’t worked out the kinks yet (like, how could I actually make MONEY doing it) but I’m toying with ideas.

I am going to try it out, take it slow, see how it progresses and tweak my method as I go along.

I did a little brainstorming today with a friend. I’m thinking we do one 3-hour class in someone’s home. The host is free as a thank you. Each participant pays a set fee for the class and all materials are provided. People will prepay and get to pick out their crystal cIMG_2124olors in advance. I can’t have more than 10 and no less than 8 people (or it wouldn’t be worth it financially for either party. If I have less people I need to charge more per person).

What are your thoughts? Want to have a class in your home? Have you ever done this?

Tuesday, May 17, 2011

Working With Rivolis

IMG_3043I’ve never worked with Rivolis until recently. I saw several different patterns and Bead & Button kept saying, “we just can’t get enough of Rivolis.”  I will admit—they’re freaking GORGEOUS. However, kinda hate working with them (so far).

I bought some assorted sizes from my usual source, Artbeads.com. I bought them in Montana Sapphire (a new favorite color of mine.) I was at the Long Island Bead Festival recently and bought some more rivolis in a lighter blue for contrast.

The first pattern I tried was Bead & Button’s, Rivoli square dance. Figuring out the correct number of beads needed (even using the chart on the diagram) was tricky. Once I completed the bracelet I was in total awe.  However, I was concerned about the rivolis being secure.

Even though this is a little over-the-top in style, I wore it the other day. I was VERY upset when I saw one of the rivolis was missing from its’ cage. I had even modified the design adding an additional round of beads to hold it in place.

IMG_3041Last night I reached into a pot holder and felt some kind of pebble in there. Before I screamed at my kids, “Who was playing with my potholders?” the beautiful blue rivoli fell out. So now I have it; but I need to figure out a way to secure it. I’m thinking some jewelry glue. Any ideas?

A free project that you can download off Bead & Button’s site is called “Stones with corners.” Before I throw in the towel on rivolis, like I have with making homemade cheesecake, I’m going to try this pattern next. So far, the rivoli sections seem more secure. I’ll keep you posted!

Monday, May 9, 2011

Tribute to Downton Abbey

Disclaimer: I want to thank Artbeads.com for providing me with the gorgeous crystals and seed beads to create this fantastic necklace.

IMG_2919I was asked by Artbeads.com to create something with the theme, ‘What’s Old is New Again.” I recently watched season 1 of Downton Abbey on Netflix. I am dying to see season 2—but in the interim I’ve been watching a ton of movies or TV series that feature the royals. It’s no surprise that the jewelry showcased blows my mind. The amount of detail and grandeur is amazing. (And now I’m hooked on Tudors!)

When I saw this pattern, Fit for a Queen, in my most recent copy of BeadAndButton.com’s magazine, “Right Angle Weave” I knew I just HAD to make it. It features pendants by Swarovski, xilion bicones, and tons of gorgeous seed beads. I finished the necklace with a really pretty antique S clasp.

My only issue with the pattern is that I think they miscounted the number of crystals. In the section regarding “Small Units” they say to substitute 3mms for the 4mms, 11s for the 8s, and 15s for 11s. If you do that, you’ll need another 75 3mm bicones. When I looked at the picture more closely (after running out of bicones) I noticed that it looks like instead of 4mms they are using the 8 seed beads. I really liked the look of more crystals so I ordered more bicones to finish the project.

IMG_2910_1

IMG_2923

IMG_2935


What I used

Sunday, May 8, 2011

Mother’s Day

I’m participating in a “Make it For Mom” contest on Artbeads.com. My entry is not a bead weaving piece (which is not like me). But this is a bracelet that I really love because it features my three children and their birthstones (which happen to all go really well together).

If I win the contest, I would get a $250 gift card. Which is probably just enabling my heavy bead-habit. But I’d appreciate it anyway!! Please vote for me!

Thursday, May 5, 2011

What Do I Need to Get Started?

I teach weaving at various libraries on Long Island. The first thing people do when they show up to my class is start pulling out pliers. For weaving, it’s rare that you need them. I’m going to list out a few things that you must have and then a few things that would be cool to have.

Needles

Many weaving projects are no-needle-required. But most of the time you need needles and there are a TON to choose from. It’s really all about what you’re comfortable working with.

My favorite needle is by Beadalon. It’s flexible and has a large eye (easy for threading) that collapses when it goes through the beads. The only problem with needles in general is their color. They are EASY to lose. I think they should make them in really bright colors. I’m sure there are needles all over my house. I lose them a lot (don’t tell my husband).

Other needles go by length, stiffness, and size. If you’re working with small beads (11/0 and 15/0) you’ll want a skinny (fine) needle. I normally work with fine gauge needles but that means they’re also delicate and they don’t last too long. Needles are something that I buy all the time. Fortunately, they’re not that expensive.

Thread burner

Honestly, this isn’t something you need to buy right away. A really great pair of scissors works well too. But a thread burner is the way to  go if you’re going to a lot of detailed weaving.  A thread burner can get really really close to the beadwork and literally burns the thread. I know it sounds ridiculous, but once you’ve used one, you don’t want to go back to scissors.

Stringing Materials (Thread)

When reading directions you’ll see a lot of them call for NYMO or tell you to condition your thread. I am a fairly lazy person—conditioning thread sounds like a lot of work to me. I prefer to use Fireline. This stuff is SUPER strong. If you stitch with a lot of crystals, you’ll want to use a product like fireline. It’s a bonded material so the crystals are less likely to cut the thread as you’re stitching. Regular thread is not as strong and can break from crystals. Remember—crystals have sharp edges.

There are other threads that are nice too because they come in various colors which blends well with the beads. Fireline or Wildfire only come in white or black. So you’ll have to decide what works best. If your tension is good, often you don’t even see the thread.

Other Tools

IMG_2907When I work I use the lid of my storage bin and lay a piece of felt in it. I use that as my work space. I do a lot of beading while watching TV (on the train, on a plane, in hotel rooms, you name it). The storage bin holds my instructions and supplies and when I work I just use the top for my work surface. The felt keeps the beads from rolling around too much. But if they do roll off the felt they are caught in the lip of the lid.

Got any tips you can share?

Wednesday, May 4, 2011

Seed Beads Demystified

One of the things that I found so confusing was understanding the sizes of beads. What exactly is an 11/0? What’s a delica seed bead? What’s a good seed bead and when does it matter?

How Seed Beads are Sized

If I were to take my seed beads and line them all up one right after another, how many would it take to make that line add up to one inch? Therefore, the bigger the number, smaller the bead. So, when you see that a seed bead is a size 8/0 (can also just say “8) it’s a rather large seed bead (especially if you’re a weaver). I normally work with 11’s or 15’s. Those are quite small and if you don’t wear glasses now you will quite soon.

Types of Seed Beads

Delica is a very specific type of seed bead. It is cut very straight. Imagine taking a pipe and cutting it in half. That is the same idea with delica beads. Many weavers prefer them because when you’re doing a specific pattern the delicas will line up perfectly. I sometimes like delicas (for peyote it really comes out beautiful) but I also really like the “rounds” type of seed bead. There are also seed beads in hex, triangle, and square (cube) shapes.

Choosing a Bead

If you’re going to do an intricate design, you need a serious quality seed bead. If you buy junk, they will all be mismatched in size/shape and you’ll be really annoyed trying to work with them. Seed beads don’t have to cost a fortune (unless they’re gold lined etc). There are some really great seed beads out there by Miyuki and TOHO. I find the best deals for seed beads are online.

My Favorite Vendors

  • Artbeads.com
    A great place to shop. If your order goes over $10 (that’s easy for me to do) then it ships free. I LOVE free shipping. They frequently have coupons available if you spend over $40.
  • BeadinPath.com
    I really love their beads. They have a LOT of vintage and acrylic that you might not find anywhere else. My favorite thing about their seed beads is the packaging. They come in tubes. I love the tubes because it makes storage and viewing your loot of colors so much easier.

There are plenty of other vendors out there but I honestly just shop at these two. I think that if you really get into stitching/weaving, you’re going to find that online is the place to shop. You’ll save a tremendous amount of money and you’ll get consistently great quality beads.

Tuesday, May 3, 2011

My Favorite Reads

Jewelry magazines and books are a lot like recipe books. Once you find a good one, you don’t like letting go, and you can keep them on the shelf forever.

I’ve checked out a LOT of books from my local library. Some have gorgeous pictures and really cool looking designs but the instructions BLOW. I’ve tried to do what they wanted and cannot follow them at all. I would consider myself an advanced weaver—I know most stitches and can design my own work as well.

Certain magazines are better than others too. Again, use your local library and see which appeal to you. If you really like them, then subscribe so you can keep them in your home.

Library tip: Libraries have to eventually get rid of old magazines—there’s only so much storage space. If you make nice with a librarian, they’ll hold the magazines aside and give them to you. Bead & Button is my favorite magazine and ordering just ONE pattern from an old issue is at least $3. So getting those old magazines is a real cost savings as well.

Magazines I’ve Enjoyed
(Many have great newsletters and free downloadable projects)

Books I Would Recommend:

What are your favorites?

Monday, May 2, 2011

How I Became Addicted to Bead Weaving

I am a crafty person. Always have been. And I have 3 kids who also like crafts, so it’s not uncommon for me to be at the local craft store Michaels. I walked in one day and they were having a make-it-and-take-it event.  The sparkly crystals caught my eye. I did the activity and then found myself buying jewelry supplies en masse.

I don’t have time (or patience) to take classes so I went to my local library and checked out every book available on beginning jewelry making. After stringing several anklets, bracelets, earrings, wrapped pearls, and necklaces I found that the jewelry magazines featured more detailed pieces that involved stitching (or weaving). I love detailed intricate type work so this really appealed to me.

In the beginning I found the directions VERY hard to follow (and my profession is writing technical directions). But, it’s a little like tax or legal documents, once you get the hang of the lingo, you can follow along. Most magazines feature how-to sections for basic stitches.

IMG_2882My first weaving piece was a daisy chain (shown here) using Swarovski crystalized pearls and jade chips for the leaves. You can do a lot with daisy chain and it’s not that difficult to master. I think I originally learned it in Girl Scouts. I recently taught my daughter, Belle, how to do the daisy chain and she’s 5 years old.

If you want to try bead weaving I would suggest you try some of the simpler stitches like cross weave (example shown here) and right angle weave. If you look in magazines like Bead & Button, you will find some designs that you can do.

Email me if you need some beading inspiration!

Friday, April 22, 2011

Make it for Mom Challenge by Artbeads.com

Happy to share with you that Artbeads.com is having a “Make it For Mom” contest. Take pictures and enter your items for a chance to win a $250 gift card!!  Click on the image below to get to the contest. Good luck!!

If you need to make something and need materials, there’s a special coupon you can use too. You can save 15% on your order of $45 or more in our Make it for Mom Sale going on right now. Just enter coupon code ZZ-MOM15 at checkout to take advantage of the savings. Hurry, this sale ends on Saturday, April 23, 2011.

Make it for Mom Sale


Make it for Mom Challenge

Tuesday, February 8, 2011

Beaded Choker Chain with Sterling Silver Snowflake Charms

This is another piece of winter/snowflake jewelry I created using some supplies given to me from Artbeads.com. These charms are pretty adorable and I imagine you can do just about anything with them. My mother is a huge snowflake fan—so when I saw them I thought of her right away.

You could make earrings with them or even a simple charm bracelet for the snow lover in your life. I wanted to do something a little different and I tend to really like to stitch beads. So,  I made a beaded chain.

018

What’s neat about this design is that it looks like a chain but it’s made of really pretty soft blue delica beads. It wears SO nicely on your neck. Not heavy at all and the charms are equally spaced across the front making for a very cute wintery necklace.

022

The supplies I used were Miyuki 8g 11/0 Trans Pearl Dusky Blue Delicas, Fireline, and Sterling Silver Snowflake with Blue Crystal Charms. You can download the free instructions here.

Full Disclosure: Most of the beads you see are from Artbeads.com.  Some of the items I had on hand but many of the items are from them. To be clear; they gave me the beads so I would create and then write. Nothing really very sinister but I need to tell you this all upfront so none of us gets into trouble.

Sunday, February 6, 2011

Chevron Chain of Ice

The challenge was to make some jewelry that brought snowflakes to mind. We’ve had quite a bit of snow here in the Northeast and I’m honestly rather sick of looking at it. However, this bracelet is so pretty I don’t even mind that it reminds me of the cold stuff. I used a pattern from an old copy of Bead & Button I had laying around. The pattern is for sale on their site.


IMG_1653


Instead of alternating the beads to create a flower design I kept all the beads the same. My friends at Artbeads.com provided me with some really pretty beads. The seed beads are  Miyuki 8g 11/0 Trans Pearl Dusky Blue Delicas and the other beads, new on Artbeads.com, are 3mm Alexandrite Druk Beads.  I have to admit I’ve never worked with Druk beads before but really loved them by the time I was done.

IMG_1654

This bracelet design is nice because no clasp purchase is necessary. You use the same beads to create your own clasp!

IMG_1657

Full Disclosure: Most of the beads you see are from Artbeads.com.  Some of the items I had on hand but many of the items are from them. To be clear; they gave me the beads so I would create and then write. Nothing really very sinister but I need to tell you this all upfront so none of us gets into trouble.

Snowflake Pearl & Crystal Bracelet

I modified a simple daisy chain with right angle weave and created a bracelet you can finish in a day. It works up very quickly. The challenge was for me to create something that resembled a snowflake. My 5 year old daughter, Annabelle, says what I’ve made is not a snowflake because a true snowflake has 6 points. She said it’s still pretty anyway—so I’m grateful.

My friends at Artbeads.com supplied me with the seed beads for this bracelet.

060

I used some really pretty silver toho beads. I also used some crystalized pearls I had on hand in a soft pink. The pink and silver beads look amazing together.

058

If you’d like to make this bracelet, feel free to download my free directions.

057

Full Disclosure: Most of the beads you see are from Artbeads.com.  Some of the items I had on hand but many of the items are from them. To be clear; they gave me the beads so I would create and then write. Nothing really very sinister but I need to tell you this all upfront so none of us gets into trouble.

Monday, January 10, 2011

Golden Crystal Drape Choker Design

013When I created this necklace I wanted to feature gold/topaz. Isn't everyone trying to buy your gold right now? Trust me; it's hot. This color, with deep brown toho seed beads is gorgeous. The necklace naturally drapes as the crystals become larger and more plentiful towards the front. It’s not that difficult to make. I would give the difficulty level on this one 2 out of 4. A beginner can certainly try it if they’re game!


This is an original design by me, Claudine M Jalajas. This necklace features genuine Swarovski crystal in 6mm and 4mm in shades of gold topaz. The choker measures 16 inches and the clasp is part of the jewelry too. All you’ll need is seed beads, thread, needle, and crystals.

028I just put the instructions on my shop for sale. I am looking for testers though.. so if you’d like to try the pattern out, free of charge, and report back to me with photos of your work, I’d like to speak with you. Please comment below or email me at cjalajas at optonline dot net. Make sure you put “Try Your Jewelry Pattern” in the subject line so I don’t miss it.