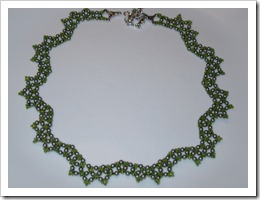
Tuesday, February 8, 2011

Beaded Choker Chain with Sterling Silver Snowflake Charms

This is another piece of winter/snowflake jewelry I created using some supplies given to me from Artbeads.com. These charms are pretty adorable and I imagine you can do just about anything with them. My mother is a huge snowflake fan—so when I saw them I thought of her right away.

You could make earrings with them or even a simple charm bracelet for the snow lover in your life. I wanted to do something a little different and I tend to really like to stitch beads. So,  I made a beaded chain.

018

What’s neat about this design is that it looks like a chain but it’s made of really pretty soft blue delica beads. It wears SO nicely on your neck. Not heavy at all and the charms are equally spaced across the front making for a very cute wintery necklace.

022

The supplies I used were Miyuki 8g 11/0 Trans Pearl Dusky Blue Delicas, Fireline, and Sterling Silver Snowflake with Blue Crystal Charms. You can download the free instructions here.

Full Disclosure: Most of the beads you see are from Artbeads.com.  Some of the items I had on hand but many of the items are from them. To be clear; they gave me the beads so I would create and then write. Nothing really very sinister but I need to tell you this all upfront so none of us gets into trouble.

Sunday, February 6, 2011

Chevron Chain of Ice

The challenge was to make some jewelry that brought snowflakes to mind. We’ve had quite a bit of snow here in the Northeast and I’m honestly rather sick of looking at it. However, this bracelet is so pretty I don’t even mind that it reminds me of the cold stuff. I used a pattern from an old copy of Bead & Button I had laying around. The pattern is for sale on their site.


IMG_1653


Instead of alternating the beads to create a flower design I kept all the beads the same. My friends at Artbeads.com provided me with some really pretty beads. The seed beads are  Miyuki 8g 11/0 Trans Pearl Dusky Blue Delicas and the other beads, new on Artbeads.com, are 3mm Alexandrite Druk Beads.  I have to admit I’ve never worked with Druk beads before but really loved them by the time I was done.

IMG_1654

This bracelet design is nice because no clasp purchase is necessary. You use the same beads to create your own clasp!

IMG_1657

Full Disclosure: Most of the beads you see are from Artbeads.com.  Some of the items I had on hand but many of the items are from them. To be clear; they gave me the beads so I would create and then write. Nothing really very sinister but I need to tell you this all upfront so none of us gets into trouble.

Snowflake Pearl & Crystal Bracelet

I modified a simple daisy chain with right angle weave and created a bracelet you can finish in a day. It works up very quickly. The challenge was for me to create something that resembled a snowflake. My 5 year old daughter, Annabelle, says what I’ve made is not a snowflake because a true snowflake has 6 points. She said it’s still pretty anyway—so I’m grateful.

My friends at Artbeads.com supplied me with the seed beads for this bracelet.

060

I used some really pretty silver toho beads. I also used some crystalized pearls I had on hand in a soft pink. The pink and silver beads look amazing together.

058

If you’d like to make this bracelet, feel free to download my free directions.

057

Full Disclosure: Most of the beads you see are from Artbeads.com.  Some of the items I had on hand but many of the items are from them. To be clear; they gave me the beads so I would create and then write. Nothing really very sinister but I need to tell you this all upfront so none of us gets into trouble.

Monday, January 10, 2011

Golden Crystal Drape Choker Design

013When I created this necklace I wanted to feature gold/topaz. Isn't everyone trying to buy your gold right now? Trust me; it's hot. This color, with deep brown toho seed beads is gorgeous. The necklace naturally drapes as the crystals become larger and more plentiful towards the front. It’s not that difficult to make. I would give the difficulty level on this one 2 out of 4. A beginner can certainly try it if they’re game!


This is an original design by me, Claudine M Jalajas. This necklace features genuine Swarovski crystal in 6mm and 4mm in shades of gold topaz. The choker measures 16 inches and the clasp is part of the jewelry too. All you’ll need is seed beads, thread, needle, and crystals.

028I just put the instructions on my shop for sale. I am looking for testers though.. so if you’d like to try the pattern out, free of charge, and report back to me with photos of your work, I’d like to speak with you. Please comment below or email me at cjalajas at optonline dot net. Make sure you put “Try Your Jewelry Pattern” in the subject line so I don’t miss it.


Monday, December 20, 2010

Happy Holidays—Free Gift Card

Thanks to my friends at Artbeads.com I am letting you know about this great offer—a FREE $10 gift card for you and your friends/family.

Artbeads. com also gives you free shipping if you order over $10 in product. Clearly, this is a win/win situation! So click the image below, fill out the form, and wait for your gift card. Don’t wait too long though; they’re only extending the offer for a couple days.

Artbeads.com $100,000 Gift Card Giveaway

Happy Holidays from Belle Designs!

Friday, October 8, 2010

Princess Pearl Necklace—Right Angle Weave

003 This is a gorgeous necklace design. It uses a modified right angle weave (RAW) stitch. The design was featured in an old copy of Bead & Button (my favorite magazine for all things beadweaving). The pattern is available for purchase here or if you can find an old copy of the magazine (like your local library?) you could get it free.  It’s in the pattern, Scalloped lace: modified right-angle weave necklace in the December 2008 issue.

Full Disclosure: Most of the beads you see below are from Artbeads.com.  Some of the items I had on hand but all the pretty stuff is from them. To be clear; they gave me the beads so I would create and then write. Nothing really very sinister but I need to tell you this all upfront so none of us gets into trouble.

Supplies:

250 3mm Swarovski Pearls
11/0 Rounded Seed Beads
Fireline & fine needle
Clasp of your choice

The directions use 4mm bicone crystals. That can hit the wallet tough as there are more than 200 crystals in this project. I decided to try small pearls instead. I used Swarovski 5810 3mm Round Pearls in Powder Green. The photos I have taken of the necklace do not do it justice—the color is gorgeous. Because they’re Swarovski, they are all perfectly uniform in color/size/shape. Perfect for a detailed project like this one.

The instructions could use some additional instructions though. I’ve made this necklace a few times with crystals and am a very experienced weaver—it’s confusing. It’s not completely clear how many sections you should make, and the final steps, which is how you get the scalloped effect,  are not clear either. No worries; I’ll help you.

Additional Instructions:

Each section is a series of 5 squares with picots all around.

019

It’s not totally clear in the directions how many of these sections you should make. This matters because you need to know how many stones you should have to finish the piece. I used some basic math and calculated the intended length of the design and found the necklace too short. I ordered 250 pearls and had plenty to make the necklace exactly the length I needed (and didn’t break the bank).

After you’ve made all the sections you will run through the top of the necklace to create the scallop effect.  This part is not that clear. In the directions they demonstrate the first section which is fine. But the next section is going in a different direction and does not work the same way.
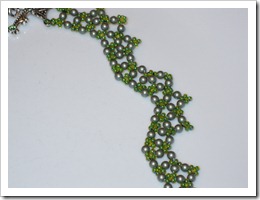
005

When you get to the next arch, you have to twist the necklace to make it flip in the same direction.

The Final Product:

The clasp on this necklace can be anything really. I chose to use a two-strand to one strand finding and then a clasp. I’ve also done a two strand clasp.  I like to use quality findings whenever possible. If you’re going to do all this work, why cheap out on lousy findings?

004

The pearl version of this necklace is really great. If you have the opportunity, try it with bicone crystals as well. Put it on and it doesn’t matter what kind of day you had or that all you’re doing is emptying the dishwasher—you will feel like a princess.

003


Thursday, June 17, 2010

Crossweave Style Beaded Necklace With Sterling Silver Starfish Charm

This necklace makes me think of the Long Island Sound and beach. On the north shore of Long Island we have very rocky shores. The texture of this necklace and varied hues of blue makes me think of summertime on the sound. Adding the sterling silver starfish charm was an extra bonus.

030

This necklace is basically made with a crossweave technique. Depending on the stringing you use would determine if you need a needle or not. I used fireline and two needles.

Using smaller fire polished beads on one side and larger on the outside ensures that the necklace drapes nicely around the neck. Supplies below will make a chain about 18 inches long.

 Full Disclosure: Most of the beads you see below are from Artbeads.com.  Some of the items I had on hand but all the pretty stuff is from them. To be clear; they gave me the beads so I would create and then write. Nothing really very sinister but I need to tell you this all upfront so none of us gets into trouble.

Supplies:

Directions:

  1. Take a comfortable amount of thread (1 yard or so) and fold in half. Put a needle on each end.
  2. Put 8 seed beads on the right strand.

    035
  3. Take the left needle and feed it back through the last bead to make a circle.
  4. Feed three seed beads on the right follow with one 6mm fire polished bead and then three more seed beads.
  5. Feed two seed beads on the left, follow with one 4mm fire polished bead, and two more seed beads.

    033
  6. Put one more seed bead on the right strand and cross your left needle through that bead.
  7. Continue steps 4 through 6 until the chain is the length you require.

     026
  8. Find the center of your beaded chain and attach your charm.

    036
  9. Add a clasp to the end.

    029